
To help the story be told as clearly as possible, I try to film establishing shots of all the locations on a wedding day.
Continue readingTo help the story be told as clearly as possible, I try to film establishing shots of all the locations on a wedding day.
Continue reading
Color grading has always been one of my favorite facets of cinematography. Think about the warm reds and oranges of Mad Max, or the darker hues of The Revenant. The ability of a colorist to alter the mood and feel of a film through hues and saturation is incredibly powerful. I’ve been wanting to make a color grading tutorial for years, but it wasn’t about a year ago that I felt that I had learned enough to even consider doing that. I knew that the time was right when I finished creating my video about my favorite picture profile for the A7Sii.
That does not mean that this tutorial only applies to wedding films shot with the A7Sii or any other camera for that matter. The philosophy, curves, and color wheels, should apply to any video you are color grading, regardless of its content. You will need a copy of Adobe Premiere Pro CC to follow along with this tutorial. Adobe currently offers a free 30 day trial of Creative Cloud with all their apps, including Premiere Pro.
I do have a couple recommendations before you start color grading. First, I would watch my first video about my favorite A7Sii picture profile. Spoiler Alert: my favorite picture profile is PP8, with the CINE4 Gamut and sgamut3.cine color space. By filming footage with that picture profile, it makes it easier to follow along with this tutorial. Second, I would invest in a good color calibration tool like a Spyder 5 Pro. If your monitor isn’t calibrated you will have no way of knowing if your color grade will look good on all screens, or only yours.
If you are interested in learning more about color grading, check out the Tao Colorist Newsletter by Patrick Inhofer. Every week, he covers the latest news, tutorials, and technology in the world of color grading. It is incredibly insightful and a joy to read every Sunday. I am also a huge fan of Denver Riddle’s Color Grading Central. He offers training, LUTs, and plugins for aspiring colorists around the world. Now if he would only make some plugins for Premier Pro. 🙂
I hope this tutorial was helpful for you. I’ll be coming out with another tutorial for color grading with LUTs very soon!
Want to watch more? Check out my reviews of the A7Sii and FS5, as well as a tip for how wedding cinematographers and photographers can get along. If you have any questions or comments about this picture profile or anything else relating to wedding cinematography, please get in touch.

Three months ago, I started making wedding cinematography training videos to help others film weddings. It took about a week after uploading my first video for me to discover that there is a massive community of wedding cinematographers out there that want to get better at their craft. As I produce more videos in this series, I find that I am asked even more questions in comments and emails. These messages are added to an ever increasing list of videos that I will be making in the future.
By far though, the most popular question I have received is, “Which picture profile should I use when shooting with my A7Sii?” This is definitely a complicated question due to the sheer depth of the picture profile menu on the A7Sii and FS5, as well as how many differing opinions there are across the many blogs and forums across the Internet. Your train of thought may have been something like mine: “Do I shoot with the new fancy SLOG3? But doesn’t that cause noise in the shadows? What about SLOG2 instead? Isn’t that going to cause an odd green tint in some images? Maybe one of the Cinegammas then? Aren’t those called Hypergammas in the higher end Sony Cameras? Why is everything so different? Am I crazy? Does this even look better?”

I’m excited to say that today I have an answer for you. After extensive testing, and reading throughout the vast corners of the Internet so you don’t have to, I have found an ideal picture profile. Please keep in mind that while this may be my favorite picture profile, it doesn’t have to be yours. You can have a different opinion from me, and that is alright.
I wanted a picture profile that would suit my needs well. It needed wide dynamic range, a flat image for color grading (but not too flat!), and be versatile for the wide variety of shooting locations I typically go through on a wedding day.
Those needs almost immediately cut SLOG2 and SLOG3, with their minimum ISOs of 1600, and their bright exposure requirements, from my list of options for picture profiles. Incidentally, the 8-bit codec of the A7Sii in SLOG3 can also cause banding in the finer color gradients like blue skies etc. I wanted to avoid this as well.
If you don’t feel like watching me ramble in the above video for 6 minutes about picture profiles, here are the settings for my favorite picture profile:
-Reset PP8 to default.
-Change the Gamut from SLOG3 to CINE4.
That’s it! Congratulations, you’re now shooting in my favorite picture profile! Leave all the other settings as they are. Go try it out and see how you like it. I’ll be making another video soon, showing how I color grade this picture profile.
Special thanks for Marien Breithouwer for originally sharing this picture profile.
Want to watch more? Check out my reviews of the A7Sii and FS5, as well as a tip for how wedding cinematographers and photographers can get along. If you have any questions or comments about this picture profile or anything else relating to wedding cinematography, please get in touch.

I would like to share with you a cool workaround I discovered that enables you to shoot with your camera in APS-C/Super35mm crop sensor mode, WHILE shooting in 4K.
Continue reading
If you’ve watched my previous two wedding cinematography vlogs, you’re probably aware that they are on the technical side. I’ve covered topics like bit-rates, color depth, picture profiles, and battery life for both the Sony A7Sii and FS5. Both are amazing cameras that I was more than happy to review and share with other wedding cinematographers. If you are looking to switch or upgrade to these cameras, I would highly recommend watching both of those vlogs.

Now, I would like to take a step back from the technical side of things, and share something that, in my opinion, has a far greater effect on how you can create great wedding films. Wedding days at their core are about relationships. The bride and groom’s relationship, the parents of bride and groom and their relationship with their children, the minister’s relationship with the couple, and many more as these two families connect on the wedding day. Let’s talk about another relationship that will affect you, the cinematographer, even more than all others on the wedding day, your relationship with the photographer.
For years, I would go show up to a wedding with no knowledge of who the photographer is, much less anything about them. All I knew is that the bride and groom had apparently hired them. Now I’m a relatively friendly guy so we would usually hit it off and work well together, but it was always a strange experience. See, weddings are unlike other 9-5 cubicle jobs where you work with the same people for long periods until they or you eventually quit or get fired. With weddings, we work with a different co-worker every week! Would you go to work without getting to know your co-workers? No! Then why would you film a wedding without getting to know the photographer beforehand?

In this video, I share an amazing tip that I learned from my friend Alex Maldonado that will help you instantly hit it off with any wedding photographer. When he first showed this tip to me it completely blew my mind. And if you’re a wedding photographer, this works for you too!
Remember, everyone wins when the wedding cinematographer and photographer get along. There is a free flow of creative ideas, both of your portfolios get amazing visuals that look better, and the bride and groom get better film and photos. It’s a win all around.
I hope this vlog helped you learn something about wedding cinematography that you didn’t know before. If you have any questions or comments, please feel free to get in touch.

For the past two weeks, I have been testing Konova’s new motorized system for use with their sliders. I have made a setup video and review of the new MS Series Motorized System.
Continue reading
Ever sinc e Instagram unveiled video uploading last month, I have been desperate to upload videos that I have previously recorded on my iphone, as well as videos from other cameras and ones that I have edited. With this easy to follow text tutorial, you will be able to upload any video you want to Instagram, even ones that are much higher quality than those you can record with an iPhone camera, such as DSLR videos, or RAW Timelapse clips. The only drawback is that you cannot use a still frame from the video that you are uploading, and your custom video cannot exceed the 15 second length.
You can view an example of a custom uploaded video on my Instagram Page.
WHAT YOU WILL NEED
That’s it! Once you get everything setup, it only takes around 5 minutes to edit your custom video and render it.
The original idea for this project came from a Google Search I did yesterday and a post on TechEnvy which used Quicktime Pro. The difference between this tutorial and that one is that Adobe Premiere is used which offers much more freedom, customization, and quality when it comes to editing your video.
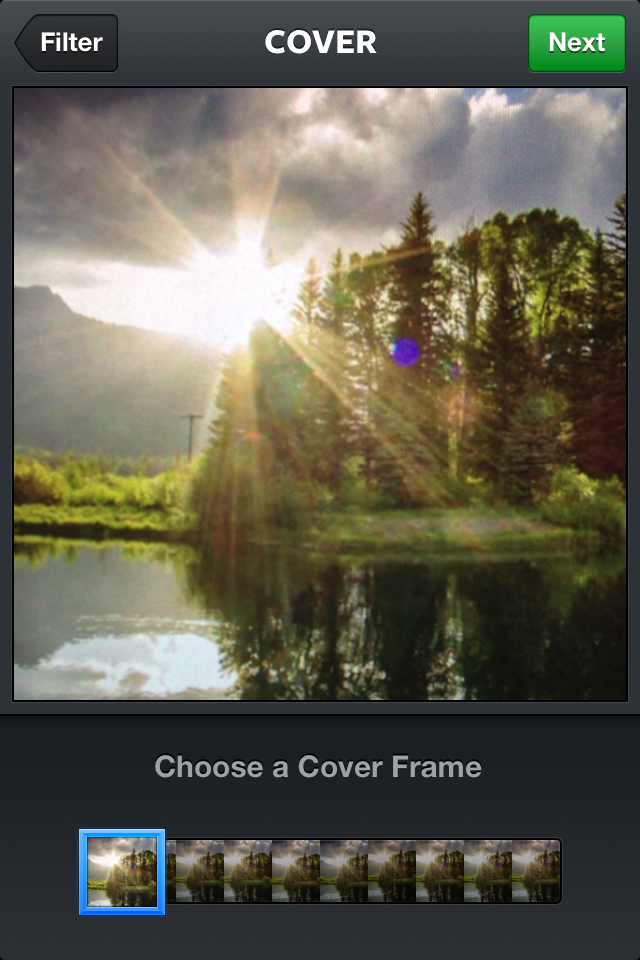
Step One
Download and install iFunBox and Adobe Premiere Pro.
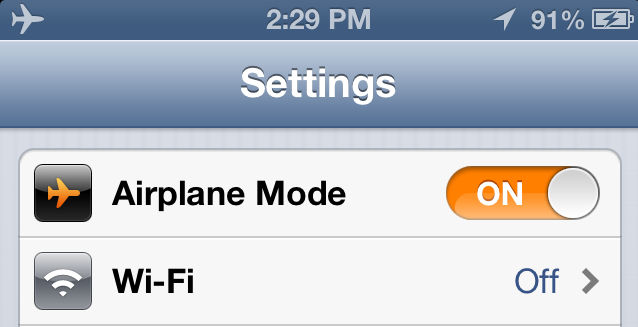
Set your iPhone to “Airplane Mode” so that it is no longer connected to the Internet.
Step Two
Open Instagram and record a video that is approximately as long as the custom video that you want to upload. Make sure you get the video length as close as possible; your custom video will have to match the length you record exactly so it doesn’t go to black at the end. Remember, you can’t have a video longer than 15 seconds.
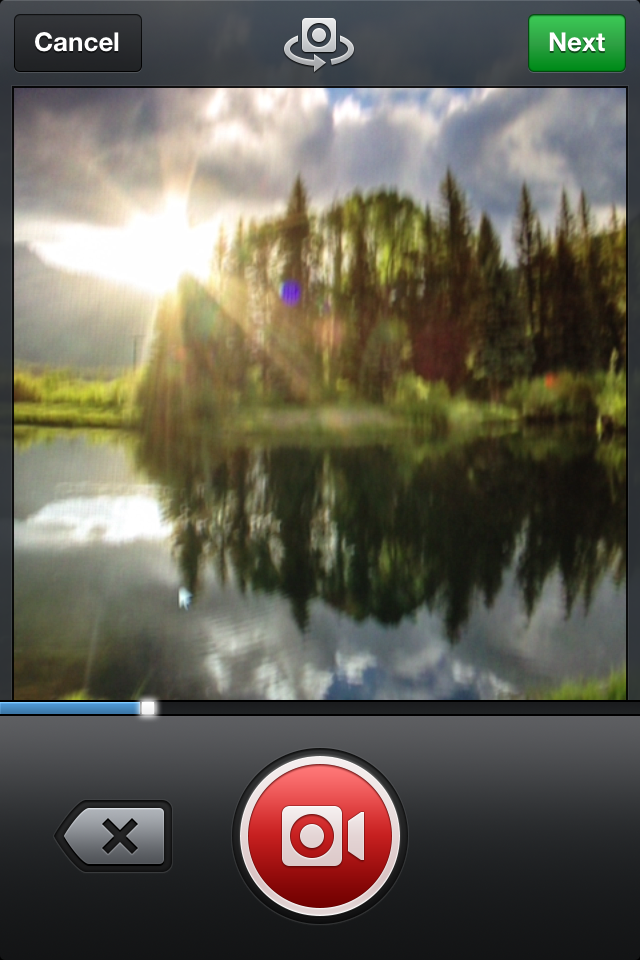
Also, you cannot choose a still frame from your custom video, meaning that you must choose a still frame from the video you record in Instagram. I find that it is easiest to record the computer screen of the video that I want to custom upload, and select a still frame from that recording. That way, the video matches the still frame.
Step Three
Type in the description for the video and select the services you want to upload it to as well (Facebook, Twitter, FourSquare, etc). Then click “Share”.
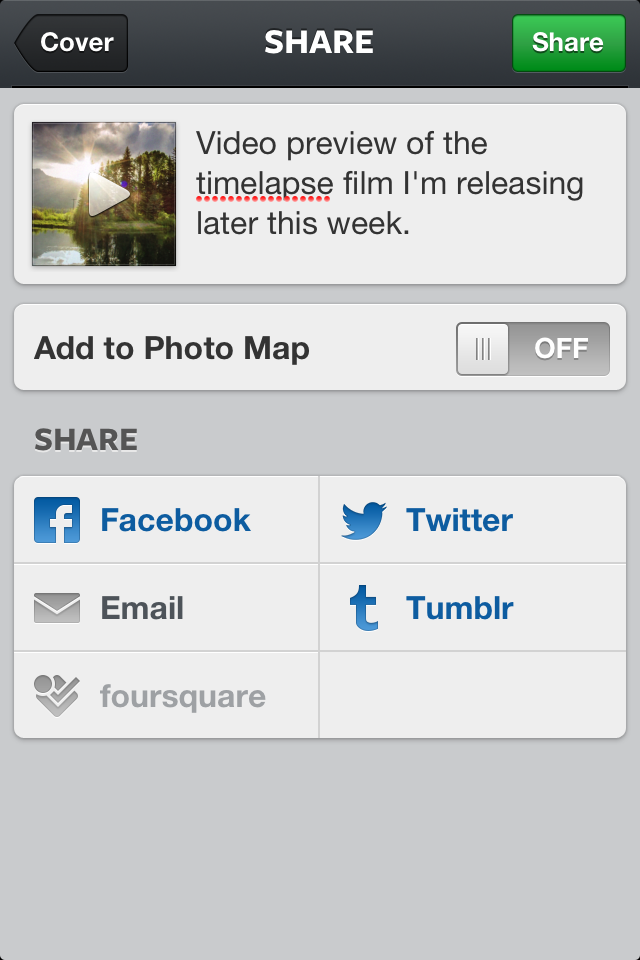
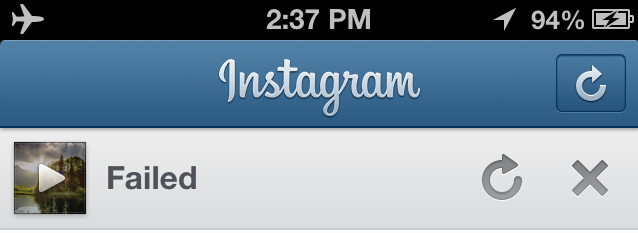
Instagram will immediately say “Failed” due to you not having an Internet connection.
Step Four
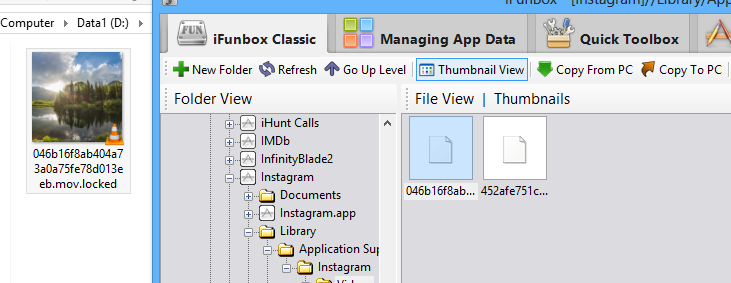
Connect your iOS device to your computer and open iFunBox. The App will recognize that your iPhone is connected.
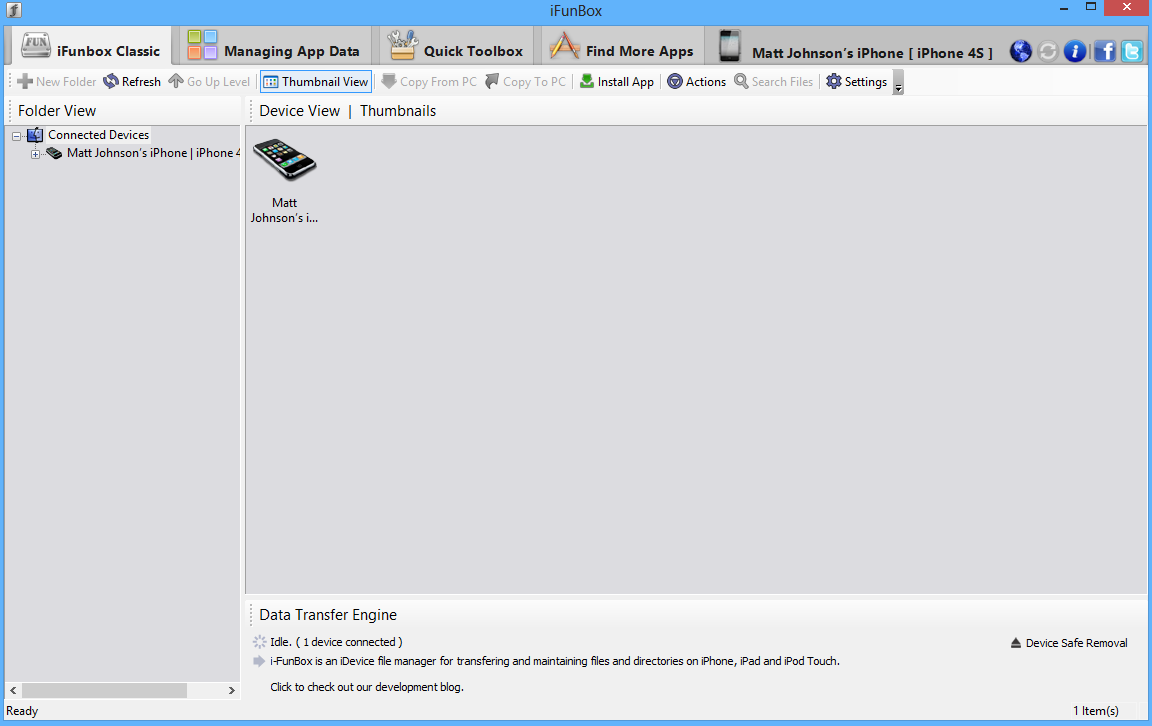
Double Click on your iPhone and you will have options such as User Applications, App File Sharing, General Storage etc.
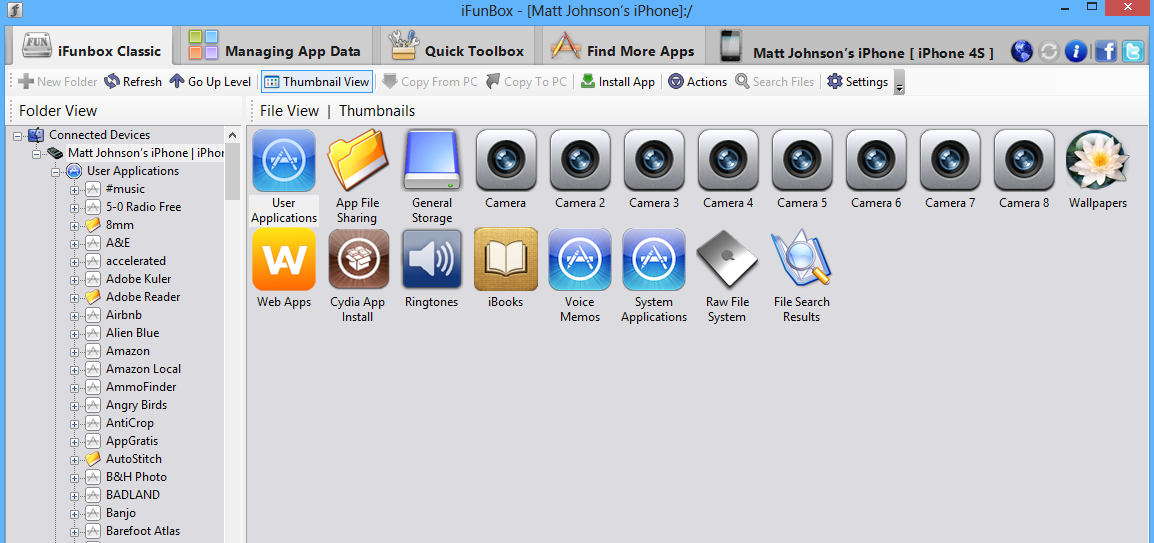
In the “iFunbox Classic” tab, DOUBLE CLICK: User Applications > Instagram > Library > Application Support > Instagram > Videos.
Step Five
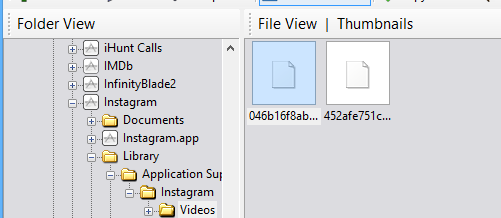
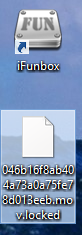
There should be two files that are both just a long sequence of numbers and letters. One of the files will end with the extension “.mov.locked”, that is the one you want. Click and drag it to your desktop. You can then minimize iFunbox.
Step Six
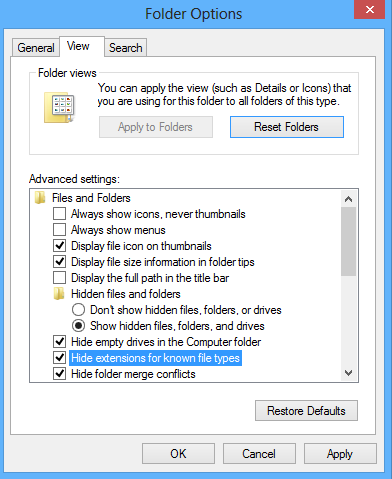
By default, Windows will not let you see the file extensions for files that it recognizes. This is to prevent users from changing them and being unable to open their files. You will need to re-enable this feature to change the file extension. Go to Start > Control Panel > Search: Show File Extensions

Click “Show or Hide File Extensions.” In the window that opens, UNCHECK the “Hide Extensions For Known File Types” box and hit Apply, then OK.
Step Seven
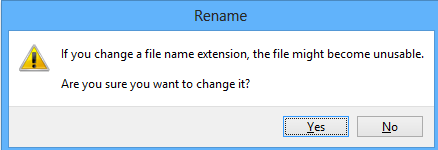
Select the file you copied to the desktop and remove the “.locked” extension from the end of it. A dialogue box should appear asking if you are sure you want to change the file extension.
Step Eight
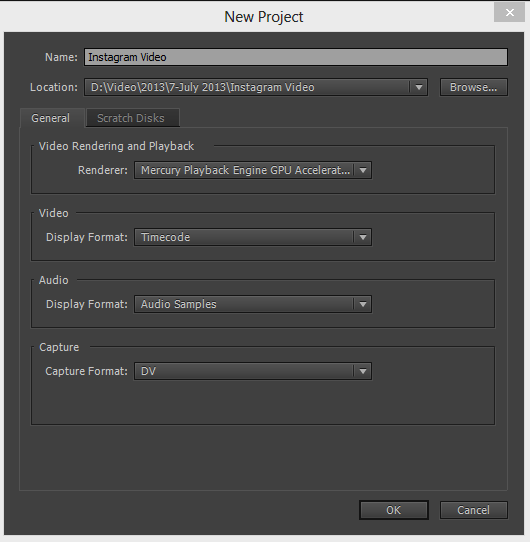
Open Adobe Premiere Pro and choose to create a New Video Project. I find it best to create a folder to keep all the project files inside. Then select “OK”.
Step Nine
If you are using CS6, a “New Sequence” Dialogue box should appear. If you are using Premiere CC, then you will need to select File > New > Sequence.
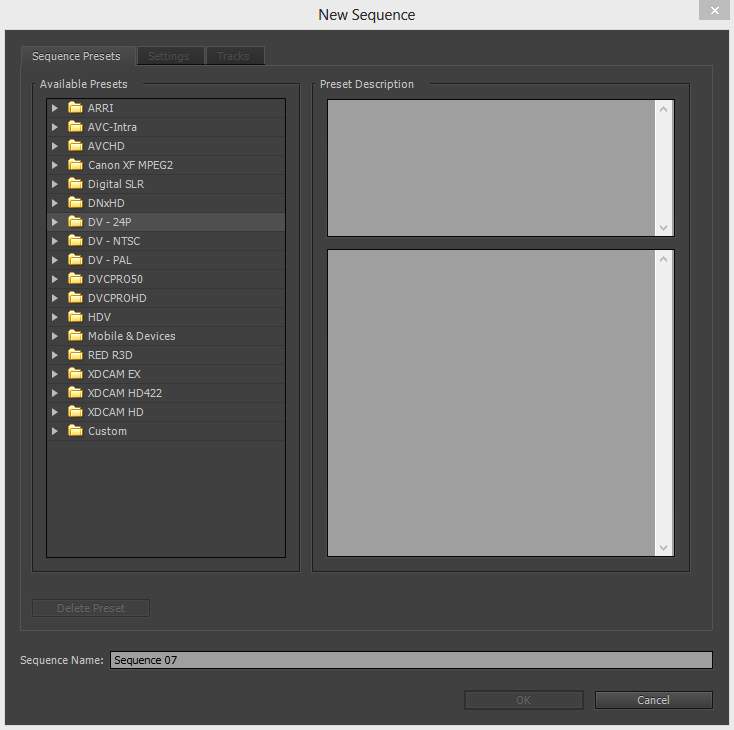
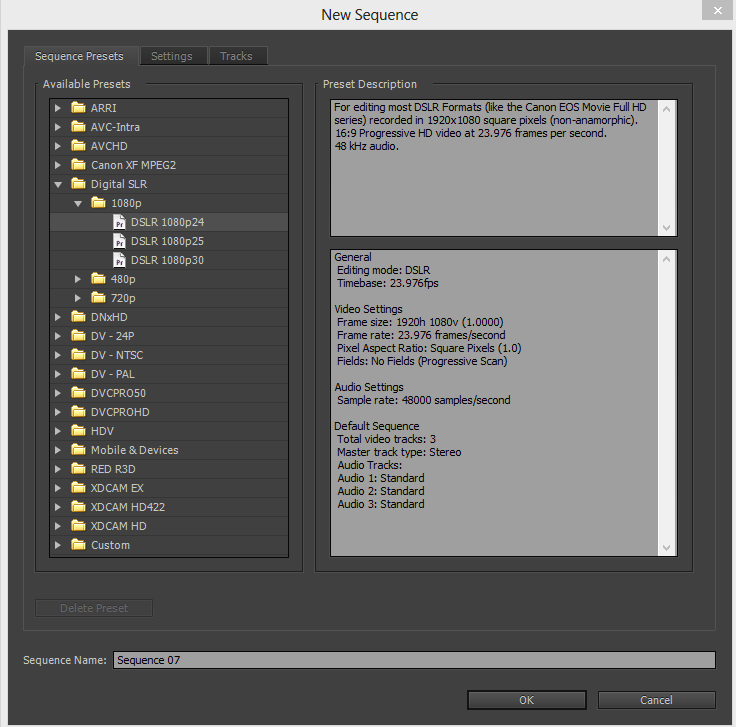
From the Twirly arrow drop down menu, select Digital SLR > 1080P > DSLR 1080p 30.
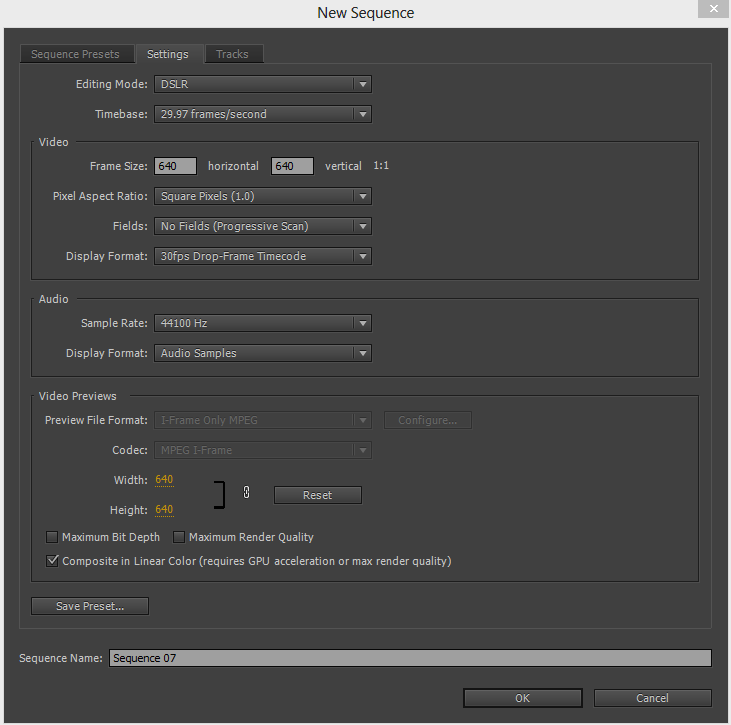
Now select the “Settings” tab at the top, and choose the following options.
Then choose to save the preset so you can use it again later.
Step Ten
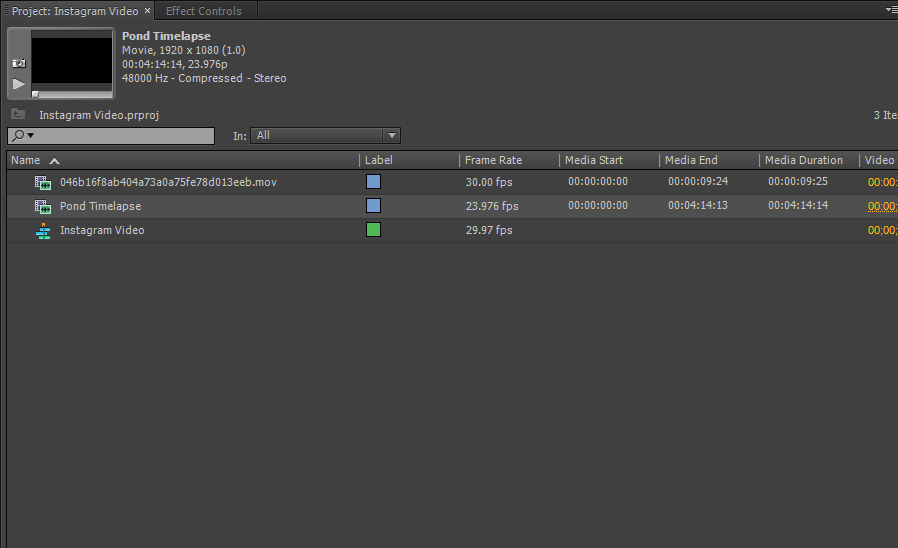
Import the video that you copied from your iPhone to your desktop into Premiere Pro. Also import the custom video you want to use in its place.
Step Eleven
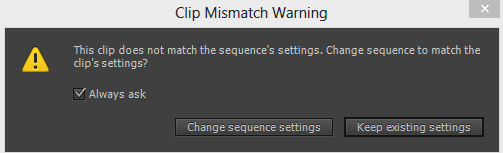
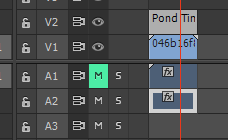
Drag your originally shot Instagram video to the timeline. A “Clip Mismatch” warning might come up but you can ignore it and tell it to “Keep Existing Settings.”
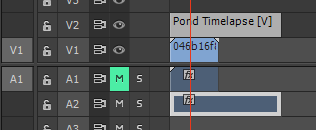
Make sure you MUTE the audio for the Instagram clip, otherwise you will have whatever audio you shot with your iPhone interfering with your custom video audio. Once you have muted the audio, drag the custom clip that you want to use onto the timeline so it sandwiches the original iPhone clip in the middle.
Step Twelve
If you are using a 1080p video file, you will notice that it is far bigger than the 640 x 640 clip size that Instagram allows. Select your custom video clip in the timeline and choose “Effect Controls”. So you can adjust the Position and Scale of your custom clip.
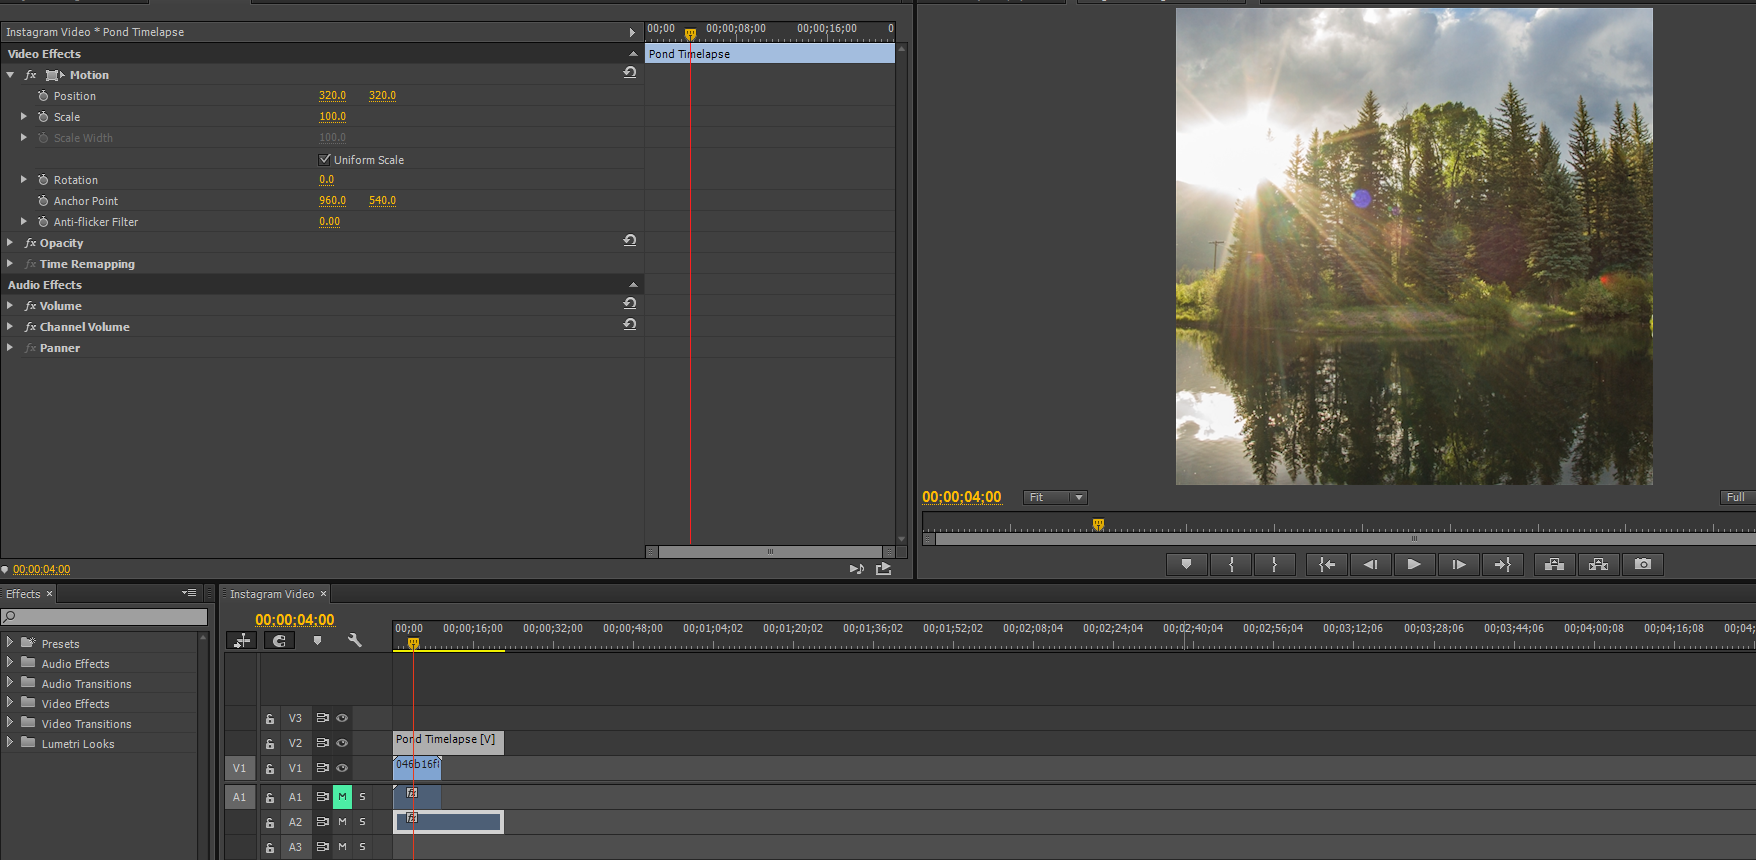
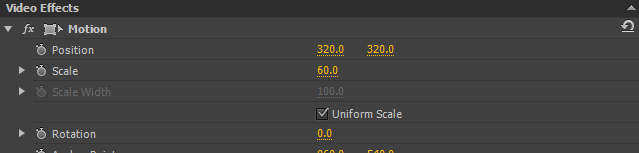
Adjust the Scale and Position of your clip so it fits nicely into the 640 x 640 window. If you are using footage that is 16:9, the sides will be cropped off. For a 1080p video clip, the Scale can be set to 60 to make the clip fit vertically in the frame.
If you want to set the scale lower you can, but be prepared for black bars at the top and bottom of the clip. You could remove the bars by placing a white color matte below the clip.
Step Thirteen
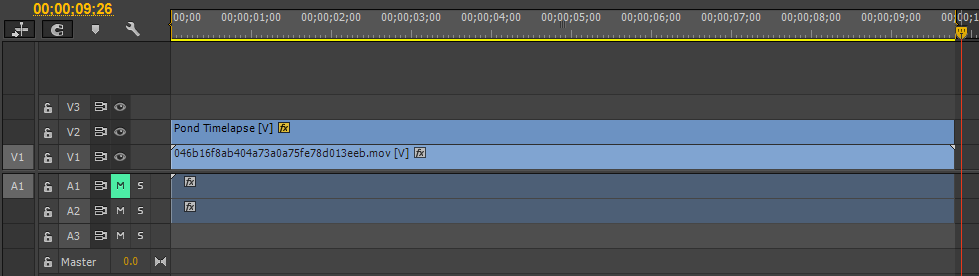
Now adjust the length of your clip so it matches the length of the clip you shot with your iPhone.
Step Fourteen
It’s time to render your clip! Set your in and out points on the clip so it knows where to render. You do this by moving the playback head to the beginning of your clip and hitting “I” and then the end of you clip and hitting “O”.
Step Fifteen
Select File > Export >Media, or select your timeline and hit CTRL + M. This will bring up the export dialogue box.
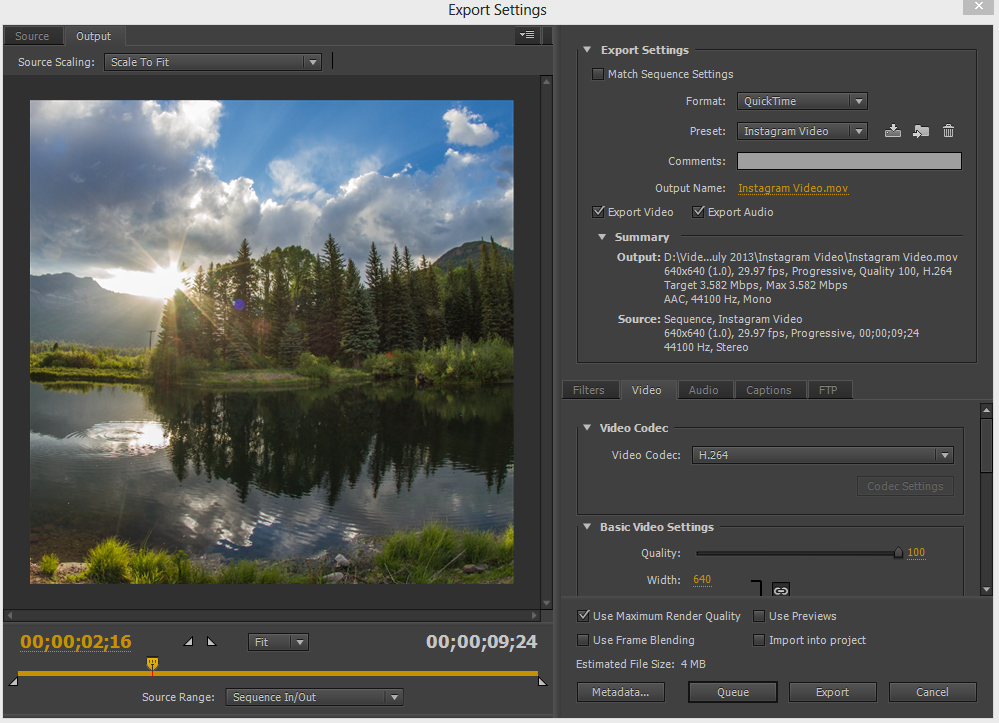
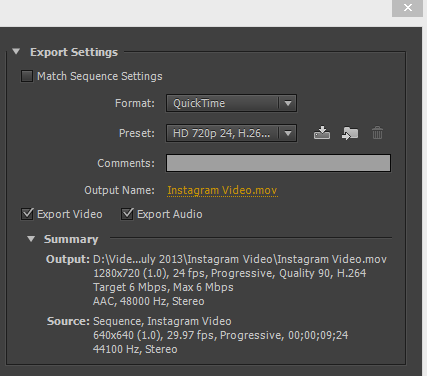
Choose the video format “Quicktime” and choose any preset from the preset dropdown menu (we are going to customize one). Make sure “Export Video” and “Export Audio” are checked, and select the file name and choose where you want the file to be saved to.
Select the “Video” tab below. Choose the following settings:
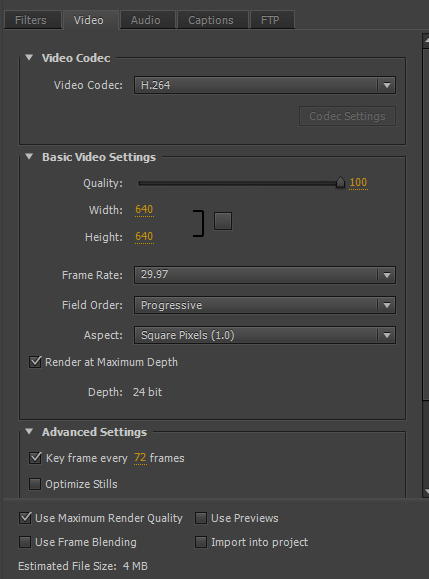
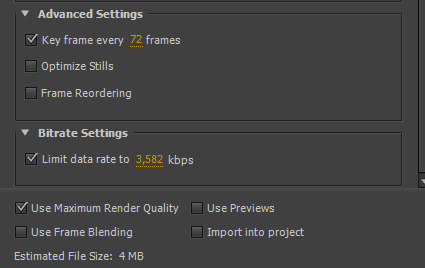
Under “Bitrate Settings” check the box and choose the limit the data rate to “3,582 kbps” and check the “Use Maximum Render Quality” box.
Click the “Audio” tab and choose:
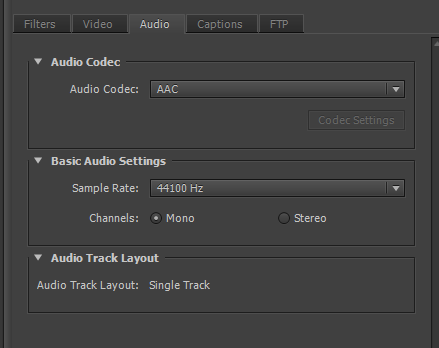
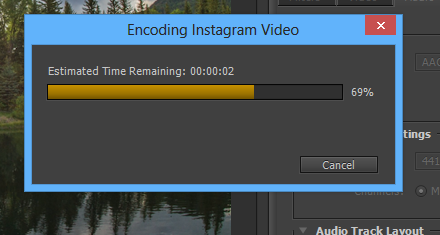
That’s it! Now save these render settings as a preset and click Export.
Step Sixteen
Once it is finished rendering, navigate to your rendered file. Rename the rendered file to the sequence of numbers and letters that the Instagram video you shot was named (copy and paste helps). Then add “.locked” to the end of the file so it looks something like A293FJEOF.mov.locked”.
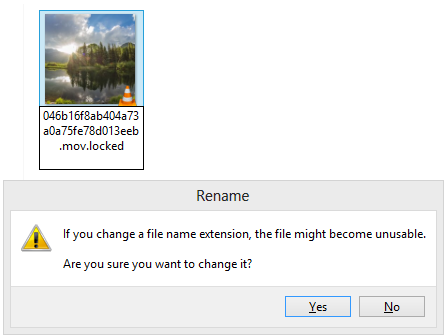
Step Seventeen
Maximize iFunbox and drag your new video file into the Video folder so it replaces the original video file. iFunbox won’t give you any warnings about copying over the files, so make sure you copy it.
Step Eighteen
Disable Airplane Mode on your iPhone and hit the swirly button on Instagram. Your custom video should begin uploading. Here is my custom uploaded Instagram video. You can also watch it on my Instagram page.

Tutorial on cropping your videos to the 2:35:1 Cinemascope and Anamorphic viewing ratio using Adobe Premiere Pro CS5. Includes a free PSD file with crop lines.
Continue reading
Turn 60p to 24p in After Effects…
Continue reading